Uncategorized
Correct method of fitting new tie bolts and pre-tensioning
2 min read
0 comments
Engr. Shafiul Bari
Shafiul Bari is a seasoned Marine Engineer with extensive experience in ship design, maintenance, and marine propulsion systems. With a deep technical knowledge of ship engineering and a passion for advancing maritime technology, Shafiul shares practical insights and expert advice to help marine professionals and enthusiasts better understand the complexities of ship systems. Through his website, he aims to bridge the gap between technical theory and real-world application, fostering a community of informed and skilled maritime engineers.
When not immersed in ship engines and technical manuals, Shafiul enjoys exploring the latest innovations in marine technology and mentoring aspiring marine engineers.
View Author Profile →.trt .tie bolt tightening .tbt
Initial preparation:
- Permission must be granted to immobilize the engine
- Spare & tools must be checked
- Conduct tools box meeting
- Hydraulic jack or tools used must have valid calibration certificate
- Risk assessment with work permit to be done properly
Preliminarily work:
- Clean the tie rod properly and carefully before inserting into position
- The lower nut of the tie rod is screwed on.
- Clean the seating surface for intermediate ring and the upper nut.
- Place intermediate ring and screw upper nut on the tie rod.
- Fit the ring screw into the tie rod and lift carefully till the lower tie rod nut seats firmly.
- In this position tighten the upper tie rod nut with tommy bar until it is firmly seated on the intermediate ring.
- Separate lifting tackle from the rod and remove ring screw.
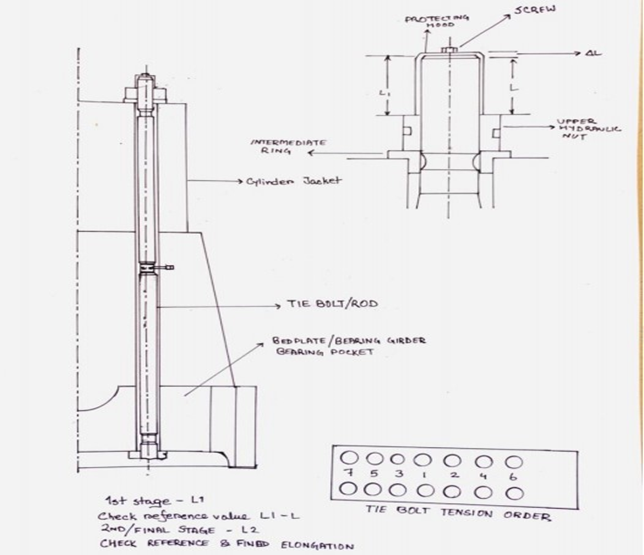
Working sequences for tensioning:
- Measure distance ‘L’ for all tie rods and record them.
- Mount pre tensioning jack on the two tie rods place opposite to each other a/a, the lower part of the cylinder jack must rest on the intermediate ring.
- Connect both the jacks to high pressure oil pump and vent the system
- Operate pump until a pressure of 350 bar (1st stage ) is reached. Maintain the pressure while two upper nuts are tightened with tommy bar.
- Release the pump pressure to zero.
- In this manner tension all the tie rods in the sequences (1/1, 2/2, 3/3, 4/4, 5/5, 6/6) and measure all the distance ‘L’ and record them as ‘L1’
- Check maker’s reference value ‘L1’-‘L’
- Repeat the same procedure for final tightening to 600 bar (2nd stage)
- Finally measure the distance ‘L’ for each rod and record them as ‘L2’
- Check maker’s reference value ‘L2’-‘L’
- The values should be same if the tie rods are correctly tensioned.
Share this article
Leave a Comment
Comments (0)
No comments yet. Be the first to share your thoughts!